How to customize your Arduino Cloud IoT dashboards on the go
The Arduino Cloud has long been a trusted platform for makers, engineers, and developers to manage their IoT projects with ease. From tracking sensor data to automating smart devices, the cloud enables seamless connectivity. Complementing this, the Arduino IoT Remote mobile app gives users the power to monitor and interact with their dashboards from anywhere. Now, we’re excited to announce a new feature that enhances your experience even further: the ability to change dashboard layouts directly through the mobile app!
Let’s dive into this exciting new update, along with some other minor features recently added to improve your experience.
Change your dashboard layouts from the IoT Remote app
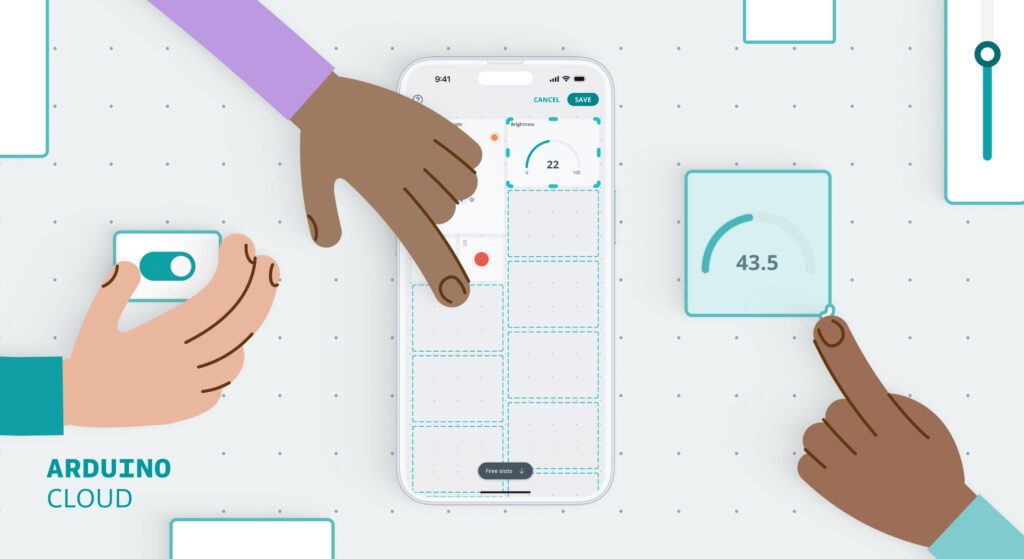
Previously, modifying or rearranging the layout of your IoT dashboards was only possible through the browser on a PC. While this worked well for desktop users, it wasn’t convenient for those who needed to make changes on the go. With the latest update, you can now modify the “mobile view” of your dashboard directly through the Arduino IoT Remote app.
It’s important to note that Arduino Cloud dashboards have two distinct views: mobile and desktop. This new feature allows you to customize the layout specifically for your mobile devices, without affecting the desktop version. So whether you’re monitoring your projects on your phone or tablet, you can now optimize the layout for a mobile-friendly experience.
By customizing the mobile view, you gain more control over how your data is displayed and interacted with on your phone—perfect for users who need a quick overview and control of their IoT systems while away from their desktops.
How to use the new layout feature
Using this new feature is simple. Here’s how you can rearrange your dashboard layout in the IoT Remote mobile app:
1. Open the Arduino IoT Remote app and log into your account.
2. Navigate to the dashboard you want to modify.
3. On the Settings menu of the dashboard, tap the Rearrange button.
4. Select a widget by clicking on it, and move it around the dashboard to the new location or change its size.
5. Click on CANCEL to discard your changes or on SAVE to save your changes, and your updated layout will be visible across all your mobile devices.
What else is new on the IoT Remote app?
In addition to the layout customization feature, during the past months we’ve introduced several minor updates to make your app experience even smoother:
- Sync dashboard cover image: Now, you can set a cover image for your dashboard, and it will automatically sync across all your devices. Whether for branding, personalization, or easy recognition, this feature ensures visual consistency on every device you use.
- Disable trigger from Notification Detail: You can now enable or disable a trigger directly from the Notification Detail screen. This feature provides quick control over automated actions, helping you fine-tune your project with minimal hassle.
- Clear notifications via the Activity Manage Panel: Keep your notifications organized by clearing them all from the new Activity Manage Panel. This helps you stay focused by removing unnecessary clutter from your feed.
Install the Arduino IoT Remote on your mobile phone
These new features make it easier than ever to stay on top of your IoT projects from anywhere with your mobile phone. Whether you’re monitoring, controlling, or tweaking your dashboard, the Arduino IoT Remote app is the perfect tool for the job, and it’s free!Ready to experience these new updates? Download the Arduino IoT Remote app today from the App Store or Google Play and take full control of your IoT projects from the convenience of your mobile device.