Create your own Red Dwarf Talkie Toaster replica

In the Red Dwarf TV series, Talkie Toaster is a monomaniacal talking toaster that tries to steer every conversation to the subject of toast. Now, YouTuber “slider2732” has gone ahead and built a chatty appliance of his own.
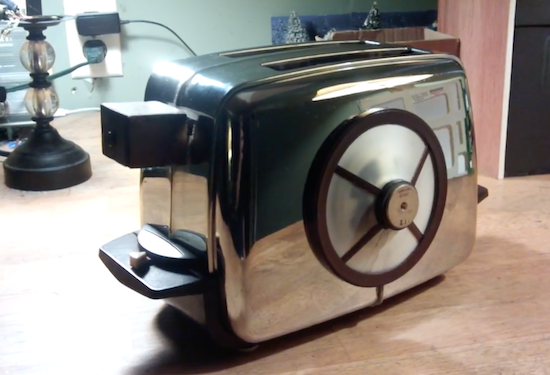
To accomplish this, the Maker embedded a PIR sensor into the toaster’s lever that communicates with an Arduino Pro Mini whenever someone is nearby. The Arduino then reads sound files loaded onto an SD card and plays them through a 3W amplifier out to a speaker underneath. The replica is also complete with a circular panel on front, made out of “laptop screen material” with a sour cream tub’s lid, and equipped with a couple LEDs.
The Arduino code uses the TMRpcm library and is a simple case of responding to the PIR sensor going high or low. The samples are loaded from the SD card. The front grill area has the speaker underneath, with two white 5mm LEDs that are connected to the Pin 9 output from the Arduino. The former laptop screen material was cut out and then fitted. The main surround is from the lid of a sour cream tub, sprayed with a Krylon brown rattle can paint. The our legs are from a window blind, cut to the right sizes and similarly sprayed, then glued with Fix-All.
The samples were recorded in Audacity, normalized and saved out as 11025Hz, 8-bit WAVs due to buffer constraints of the Arduino Pro Mini.
slider2732 walks through the entire build and shows it off in the video below!
November 28th, 2016 at 19:01:25
This is so cool!
November 28th, 2016 at 19:02:26
That’s a cool toaster!
November 28th, 2017 at 02:19:32
Just found this, by accident a year later !
He’s still in our kitchen, still asks if i’d like toast in the morning and will be upgraded at some point with extra house security features….i’ve decided he might like something to talk to and am now dinking with the Talkie library.
Btw, to explain the laptop screen material – if you take apart a laptop screen, there are several layers of plastic sheets behind the screen. One of those was just right for a strong semi transparent covering in the speaker area.