The Arcade Machine, by Timothy (15)

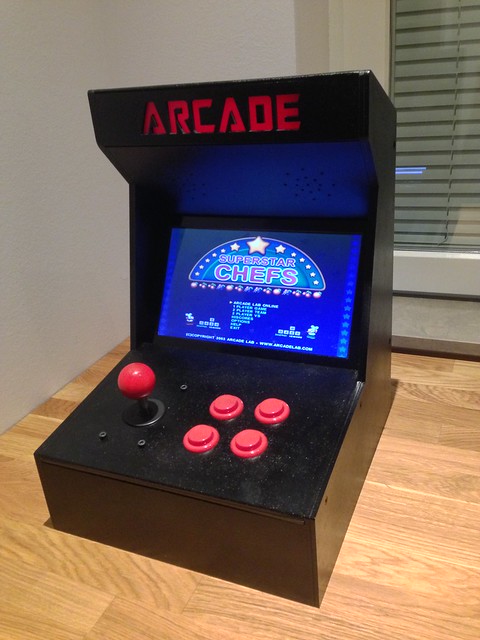
[Timothy Zandelin], a 15 years old Arduino enthusiast has sent us his first Arduino Project, an arcade interface based on Arduino Leonardo.
The cabinet is made of 4mm HDF and were laser cut at “Fabriken” in Malmö. The red arcade sign in the top is produced in 5mm translucent acrylic. All design and construction drawings were made in Illustrator. I used an Arduino Leonardo to connect the joystick, buttons and the LED light. The game installed, Superstar Chefs, is an old game developed by my dad’s cousins.
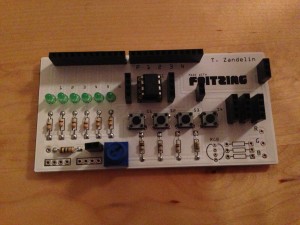
On the other hand, Timothy also built his own prototyping board to learn about how to use different inputs and outputs.
My prototype board was made with Fritzing.
It includes:
– 6 green 3mm LED’s,
– 11 resistors (6 330 ohm, 4 10K ohm and one 100 ohm),
-1 dip8 socket with an ATtiny45,
– 1 potentiometer,
– 4 pushbutton and header sockets.
I created this prototype board to easily get started with Arduino.

Timothy, welcome on board!
November 27th, 2012 at 08:23:36
hey @n3m0 ,
what’s up with ‘Kickstarter,trademarks and lies’ ???
why did you close it down ?
you don’t like anymore,to listen to your comunity opinion ?
should we post here instead ?
November 27th, 2012 at 10:06:27
How is the screen controlled? I understand the game controls are wired up to the Arduino Leonardo, but what about the screen? Would love to know more.
November 27th, 2012 at 15:51:23
Hello David,
I used an old netbook witch I separated the screen from the computer.
I plan to add more pictures on my Google+ account, but right now you can see one picture showing the inside.
Link:
https://plus.google.com/117032776444692765621
November 27th, 2012 at 16:22:01
Thanks Timothy!
November 27th, 2012 at 16:54:22
This is kind of rude, and I apologize in advance. It was not my intent to hijack this comment thread. On the other hand, I believe it was far ruder to use a puerile excuse as a few-posts-long flame to silence the community when you asked for our opinion in first place, just because it was backfiring against you. The truth about the connections betwen smARtDUINO and the manufacturing of ARDUINO™: http://smartduino.com/do-you-know-mr-chris-anderson/
November 28th, 2012 at 18:04:11
Nice work
How are you interfacing the display?
November 28th, 2012 at 23:48:43
That is a really really sweet build. You must be proud of that, I certanly would.
How did you find getting that board done by Fritzing? Am thinking about using them myself. How much did that board cost you (if you dont mind me asking) did you have a single board printed or multiple?
Thanks and nice job with it, I would love to have my own arcade machine.
November 28th, 2012 at 23:51:22
Oh and please stop HiJacking threads people, this is not the place to discuss that issue. The comments we turned off on that blog post as they were getting increasingly angry and it was turning into a flaming post.
If you want to talk about it then I would go and use that Yellow Boards own site.
November 29th, 2012 at 01:22:32
Timothy, very cool. Can you show us your drawings?
November 29th, 2012 at 19:50:02
@Nick:
Thanks! The screen is separated from the computer but is still connected.
@Vimes:
Thank you! I found Fritzing while I was reading a tutorial on Arduino’s website. The board costed 34€ + vat and shipping. I just bought one and I can recommend Fritzing. Good luck with your project.
@Justin:
Thanks! You can find the drawing at my Google+ page.
November 30th, 2012 at 11:53:14
JAJAJA it looks quite similar to the one I made for the ATTiny 24/44/84 😛
The funniest thing, is that I created my trainer for the same purpose, to create an arcade interface (but in my case for PS3).
http://fritzing.org/projects/attiny244484-trainericsp-board/
(the one that appears in the picture is a DIY etching, but the schematics and parts are available in fritzing)
December 23rd, 2012 at 16:39:02
Usually I do not read article on blogs, however I would like to say that this write-up very forced me to take a look at and do so! Your writing taste has been amazed me. Thanks, quite great post.